Charge
You charge the battery with the white, wide plug plugged in the supplied charger. When the lights change to green it is fully charged.
Preparation
- Mount the battery under the fastener on the underside so that it is as symmetrical as possible.
- Turn on the transmitter (hand control or similar)
- Connect the battery on the red plug under the drone
- Place the drone with "nose" same way as yourself (see illustration)
- Forward, the "regular" reader direction on Microbit corresponds to. In addition, white propellers will indicate forward, while black propellers will be at the back.
Flight
- Active the drone (reinforcement) by clicking A and B at the same time on the hand control. The propellers start spinning gently, affected by the movements of the hand control
- Click B to increase the height by 25 cm
- Click A to lower the height by 25 cm
- Change the angle of the remote control to change the drone's angle. Turn the control the road you want the drone to fly.
- The maximum height is set at 2.5 meters, but you can program this yourself in the hand control.
- The drone uses a barometer to achieve the desired height. The height may vary slightly, but this will be better in future updates.
- In case of risk of crash, you can shake the hand control. The height is then set to 0 and the drone of emergency lands.
- To land, click A until the drone is down on the ground then click A + B to turn off the engines again.


Place you the same way as micro: Bit for best control while flying.
Remote Control / Display

Variables
The most important variables in the hand control are:

Forward and backwards. We get outinput.rotation(Rotation.pitch) from the Accelerometer, which gives us the angle. 0 degrees is neutral when the control is flat on a table. We can have both positive and negative angles. Positive angles for example +23º take the drone forward while negative angles, eg -17º makes the drone fly backwards.

Almost the same as pitch, just that here is the direction right and left.

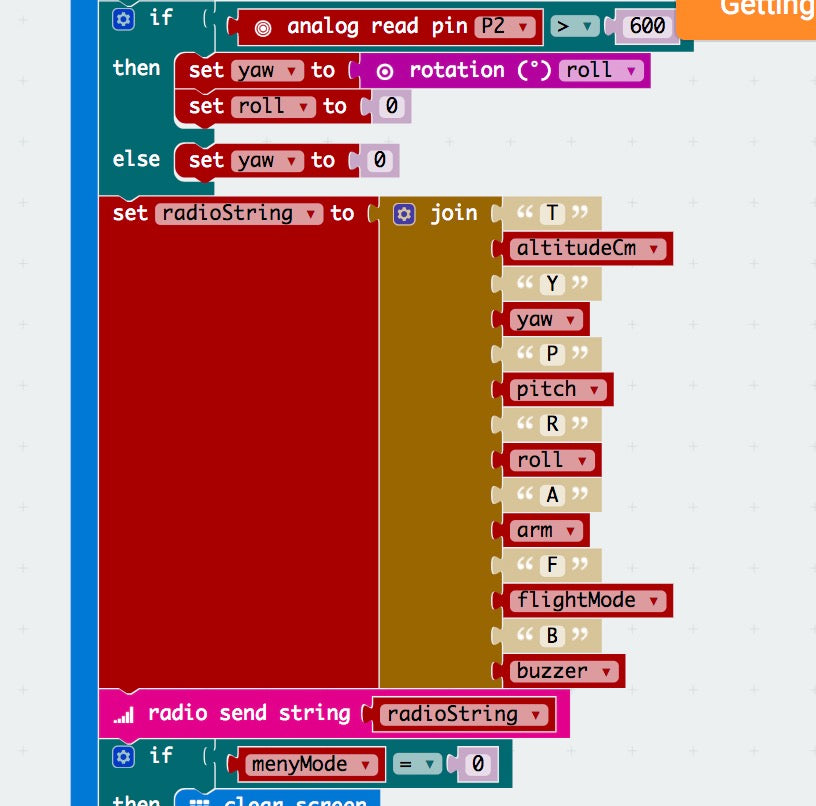
This causes the drone to rotate sideways to the right or left. High numbers rotate faster. Maximum values are -90 to 90. 0 means no rotation. To use YAW, place your thumb between 2 and +3V and till the control to the side.

The desired height we want the drone to have, in centimeters.

Arm (reinforcement), or activation, is a safety barrier that is normally set to 0. For the drone to fly, this value must be 1 or higher.

Flight Mode: This should be set to 1 as standard. Flight mode may be replaced by other and simpler functionality.
- 0: Acro Mode, the drone can loop (experimental, tested, is not recommended at this time)
- 1: Stabilise mode (standard, drone stabilizes itself horizontal)
- 2: Navigation Mode (self -navigation) This is likely to be changed
- 3: Calibration Mode: Useful feature that calibrates the drone's Accelometer. This feature is likely to be moved so that it is activated from the drone instead of the remote control.
To change flight mode: Click A until a letter comes. Tilt Micro: The bit to a page to change the letter. Click B to activate the new mode.
![]()
Set this value to 1 to make a beeping sound from the drone's buzzer (speaker).
Remember to put it back to 0 again so that it does not beep constant. The buzzer is used to alert empty battery on the drone.
![]()
Distance to the nearest obstacle in centimeters, measured from the sonar of the drone. Distances up to 4 meters can be measured.

This is a text string that contains all control information from remote control to drone. You put together the different values using the join function. One of the following letters should be combined with the given value. T (throttle/height), y (yaw), p (pitch), r (roll), a (arm), f (flight mode), b (buzzer).